A quality preliminary impression should record all anatomic structures and landmarks that will be engaged by the finished dentures. This will permit the fabrication of properly designed and extended custom impressions trays which is the basis of obtaining a quality master impression. This program of instruction offers some valuable insights into the making of preliminary impressions for edentulous patients.
Complete Dentures – Preliminary Impressions — Course Transcript
- 1. 5. Preliminary Impressions John Beumer III, DDS, MS Division of Advanced Prosthodontics, Biomaterials and Hospital Dentistry UCLA School of Dentistry and Frank Lauciello DDS Ivoclar Vivadent This program of instruction is protected by copyright ©. No portion of this program of instruction may be reproduced, recorded or transferred by any means electronic, digital, photographic, mechanical etc., or by any information storage or retrieval system, without prior permission.
- 2. Preliminary Impressions
- 3. Preliminary Impressions Purpose: -for diagnosis and construction of custom impression trays . Requirements: -must capture all intraoral landmarks, retromolar pads, retromylohyoid space, hamular notches, etc. -will be slightly overextended but must essentially capture the 3-D contours of the vestibular borders of the limiting structures. ** An accurate preliminary cast that records all anatomic landmarks that should be covered by a denture permits fabrication of properly extended custom trays that will expedite border molding and facilitate a quality final impression.
- 4. Preliminary Impressions
- 5. Preliminary Impressions – Armamentarium -Alginate (reversable hydrocolloid) -Tray Adhesive -Edentulous metal stock trays -Plastic mixing bowl -Round edge spatula -Periphery wax -Water bath -Mouth mirror -2×2 gauge
- 6. Preliminary Impressions Select a stock tray Extend tray only where necessary with soft periphery wax Warm the periphery wax in a warm water bath, insert in patients mouth and mold the periphery wax to the intraoral contours Spray with tray adhesive Irreversible hydrocolloid impression The preliminary impression should have no major pressure spots or voids and it should capture all peripheral extensions Pour impressions in plaster with adequate bases including the central “tongue” area of the mandibular impression
- 7. Warm the periphery wax in a warm water bath, insert in patients mouth and mold the periphery wax to the intraoral contours. **Note: the pts existing denture can be used to help select an appropriate size tray. Preliminary Impressions
- 8. Preliminary Impressions Spray alginate adhesive onto tray
- 9. Practice tray insertion Mix the alginate with the round edge spatula . Mix in a vigorous manner using sweeping strokes against the walls of the mixing bowl. Mix to a creamy consistency . It is often recommended to use slightly less water than the directions specify to achieve a thicker mix. This is especially true for the maxillary impression to reduce the likelihood of gagging. Use the mirror handle to retract the lips as you rotate the tray into position . Message the lips and cheeks to border mold the peripheries . Tray ready to insert Alginate Mixing Tips:
- 10. Preliminary Impressions Mix alginate and load tray
- 11. Mandibular Alginate Impression Seat the tray and hold it firmly in position. Have the patient lift their tongue and displace it anteriorly .
- 12. Mandibular Alginate Impression Ideal impression should: Show no pressure spots Record the ridge, peripheries, retromolar pad, and the retromylohyoid fossa.
- 13. Insert tray Seat posterior portion Rotate the anterior portion into position Border mold the impression Completed impression Maxillary Alginate Impression
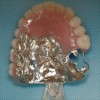
- 14. Dense mix of plaster Avoid entrapment of air bubbles Pour the impression with adequate plaster to create a base Note: The plaster should capture the contours of the labial-buccal border . Pouring the Preliminary Casts
- 15. The preliminary impression should have no major pressure spots or voids and it should capture all peripheral extensions. Pour impressions in plaster with adequate bases including the central “tongue” area of the mandibular impression. Completed Impressions
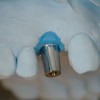
- 16. Alternate Technique- Accu-dent
- 17. Accu-Dent System 1 Irreversible hydrocolloid (hydrophilic) Two viscosities Non-slumping Premeasured sealed packaging Syringe delivery Temperature controlled Unique tray design Single entry impression system
- 18. Tray Selection
- 19. Post Dam Locate the physiologic posterior palatal seal area by having patient say “ah” Using an indelible stick, mark the palate just distal to where the palate vibrates. Palpate where the palatal tissues are displaceable (glandular area) and mark.
- 20. Mix the Syringe Gel using 70 °F water measured to the designated line on the vial. Back load the syringe Replace the plunger and express out any air. Set aside Syringe Gel
- 21. Mix the Tray Gel using 70 °F water measured to the designated line on the vial. The mix will appear dry at first but do not add additional water. Tray Gel
- 22. Accu-Dent Maxillary Impression Make sure a small amount of Tray Gel is pushed through the large holes in the tray for retention. Hold the tray under cold running water and smooth the surface with your fingers. The proper shape of the Tray Gel material is very important: most of the material should be in the front sloping to very little in the back. Loading the tray
- 23. Wipe dry the vestibules and palate with a 2×2 gauge. Express a line of the Syringe Gel into the vestibule from the hamular notch to the midline. Continue from opposite posterior to midline. Do not go all the way around in a single pass. Taking the Impression Accu-Dent Maxillary Impression
- 24. Taking the Impression Place a small amount of Syringe Gel in the anterior vault of the palate. Seat the tray from front to back. Stop seating the tray when a small amount of Syringe Gel appears in the distal edge of the tray. Accu-Dent Maxillary Impression
- 25. Pull straight down once on the filtrum at the vermilion border. Massage the cheeks very lightly downward with the fingers. Have the patient open wide Border Molding Accu-Dent Maxillary Impression
- 26. Tray Removal When set, break the seal at the distal buccal periphery and carefully remove the impression. Using the handle alone to remove the impression might dislodge the material. Disinfect according to OSHA guidelines and immediately pour the model Accu-Dent Maxillary Impression
- 27. Impression tray acts only as a method of delivering the impression material Accu-Dent Maxillary Impression
- 28. Accu-Dent Mandibular Impression
- 29. The lower Accu-Tray selection is accomplished in two steps, 1) tray type and 2) tray size Chose the tray that best suits either a normal ridge, or a highly resorbed ridge. Trays # 26-30 are designed with a moderate distal rise to accommodate the moderately resorbed ridge . Trays #20-24 are designed with a high distal rise to help accommodate the severely resorbed ridge . Accu-Dent Mandibular Impression Tray Type Tray Selection
- 30. Use the supplied calipers to measure the width of the residual ridge in the first molar region. This can be done on the existing denture, as shown, or in the patients mouth. Use this measurement to select the correct size lower tray. The caliper measurement should line up with the large holes in the first molar region of the lower tray. When in doubt use a smaller tray. Accu-Dent Mandibular Impression Tray Size Tray Selection
- 31. Mix the Syringe Gel using 70 °F water measured to the designated line on the vial. Back load the syringe Replace the plunger and express out any air. Set aside Syringe Gel
- 32. Mix the Tray Gel using 70 °F water measured to the designated line on the vial. The mix will appear dry at first but do not add additional water. Tray Gel
- 33. Mix the Tray Gel and place half on each side of the tray. Make sure that some of the tray material is pushed through the holes. This is the correct shape of the loaded tray. More material should be in the posterior of the tray. Give the Tray Gel a surface wash and rub smooth under cold running water with your fingers. Accu-Dent Mandibular Impression Loading the Tray
- 34. Express Syringe Gel from the retromolar pad forward to the midline. Repeat on the other side of the arch. It is not necessary to place Syringe Gel into the lingual vestibules. Place tray front to back until Syringe Gel appears in the posterior of the tray. Have the patient bring their tongue forward as you rotate the tray backward into position. When the Tray Gel rises up in the distal, Stop. Accu-Dent Mandibular Impression Taking the Impression
- 35. Completed lower impression Accu-Dent Mandibular Impression
New Lectures
 Angled Implants
John Beumer III DDS, MS
Allesandro Pozzi, DDS
Allesandro Pozzi, DDS
 Cement Retention vs Screw Retention
John Beumer III DDS, MS
Robert Faulkner DDS, MS
Robert Faulkner DDS, MS
 Implants and RPDs
John Beumer III DDS, MS
Ting Ling Chang DDS
Robert Faulkner DDS
Ting Ling Chang DDS
Robert Faulkner DDS
 Computer Guided Treatment Planning and Surgery
John Beumer III DDS, MS
Allesandro Pozzi, DDS
Robert Faulkner DDS
Allesandro Pozzi, DDS
Robert Faulkner DDS