Implant Dentistry – Single Tooth Implants – Presentation Transcript
- 1. 18. Single Tooth Implants Mete Fanuscu DDS John Beumer III DDS, MS Division of Advanced Prosthodontics, Biomaterials and Hospital Dentistry, UCLA This program of instruction is protected by copyright ©. No portion of this program of instruction may be reproduced, recorded or transferred by any means electronic, digital, photographic, mechanical etc., or by any information storage or retrieval system, without prior permission.
- 2. Single Tooth Implants The goal with the single tooth implant restoration is to mimic function and esthetics of the natural tooth. A sound esthetic result is dependent upon: ! Optimal bone and gingival contours ! Accurate 3-D implant positioning ! A good ceramist
- 3. Single Tooth Implants ! Successfully used since late 1980s to replace ! ! ! ! single teeth, both in the anterior and posterior sites. Implant loss has been reported to be < 5%. No difference has been noted between sites in maxilla and mandible. Failures -About 50% have been pre-prosthetic and 50% post-prosthetic Complications include screw loosening, fistulas at the implant –abutment level, esthetic problems and post-operative neurosensory disturbances. Esposito et al, 1998
- 4. Working up The Single Tooth Implant Case ! Diagnosis: Assessing hard and soft tissues, and their relations to each other -Clinical Evaluation -Study Models -Implant Template -Imaging Evaluation ! Treatment Plan: Designing and sequencing surgical and restorative aspects of the treatment. -Restorative Design -Surgical Design ! Therapy: Execution of the clinical procedures.
- 5. Diagnosis – Clinical Evaluation ! A- Edentulous tissues ! B- Residual edentulous space ! C- Adjacent teeth ! D- Opposing teeth Functional and esthetic outcome of the single tooth implant therapy depends on the proper clinical analysis of these four elements.
- 6. Diagnosis – Clinical Evaluation A- Edentulous tissues Amount of attached tissue is important in establishing periodontal health around the implant crown. ! Achieving ideal soft tissue form and implant position is dependent upon residual tissue contours. Interdental papilla height and buccal plate should be carefully analyzed for deficiencies. These deficiencies might effect functional and esthetic outcome of the implant restoration. ! Flat papilla causing dark space Adequate plate Deficient plate
- 7. Diagnosis – Clinical Evaluation Buccal plate deficiency in single tooth site ! Following extraction, particularly if traumatic, the labial plate resorbs ! Resorption creates a site that dictates a palatal placement and a ridge lapped restoration Implants placed in such sites lead to :
- 8. Diagnosis – Clinical Evaluation Labial or Buccal plate deficiencies – Single tooth sites ! Ridge lapped restorations ! Hygiene is made more difficult ! Esthetics is compromised in patients with a high smile line who display significant amounts of gingiva ! Esthetics is compromised because most such patients lack an interdental papilla (arrow)
- 9. Bone augmentation for building the site Horizontal Deficiencies Woven Bone Grafting anterior horizontal deficiencies has been relatively predictable due to minimal loads usual in this region.
- 10. Horizontal Deficiencies Bone augmentation Grafting serves to restore bone and soft tissue contours to enhance the final esthetic result by idealizing implant position
- 11. Horizontal Deficiencies Bone augmentation Normal Bone vs. Grafted Bone Lamellar Bone The bone implant interface is compromised in sites with woven bone. At some sites, the woven bone is not replaced with dense lamellar bone. Woven Bone Result: The load carrying capacity of implants in grafted bone may be compromised.
- 12. Diagnosis – Clinical Evaluation B- Residual edentulous space ! ! ! Interarch distance should be minimum 2 mm in the anterior sites and 4 mm in the posterior sites. Mesio-distal distance should be about 7 mm. When there is over 10 mm of distance, implant size and number should be carefully considered for avoiding implant overloading. Also, when ridge position dictates the implant position to be lingual to the tooth position, buccal cantilevering of the restoration might cause overloading. Size of the missing tooth space in relation to contralateral tooth in the anterior region should be carefully matched for good esthetic results. Crown/implant ratio should be kept to 1:1 for sound biomechanics.
- 13. Diagnosis – Clinical Evaluation B- Residual edentulous space Adequate interarch distance (yellow) More mesio-distal distance than contralateral (green) Extra width due to rotation of #10 (red) Buccal cantilevering (red) might cause overloading due to off-axial loads.
- 14. Diagnosis – Clinical Evaluation C- Adjacent teeth ! ! ! ! ! Prognosis of the adjacent teeth is very important for avoiding potential implant failure inflicted from adjacent pathology. Soft tissue contours and levels should be reviewed to identify any deficits that might have direct impact on the esthetic outcome. Position of the adjacent teeth (rotated, tilted, out of curve, extruded, intruded) along with position of proximal contacts can cause functional and esthetic problems if not addressed properly. Wear facets should be carefully analyzed to understand the occlusal pattern. Restorations and materials on the adjacent teeth would assist in designing the optimal implant restoration.
- 15. Diagnosis -Clinical Evaluation C- Adjacent teeth ? ? Prognosis of endodontically treated teeth should be assessed and pathology should be ruled out. Also, integrity of the restorations should be examined. Existence and maintenance of harmonious gingival levels provide esthetic outcome. Rotation of #10 decreases papilla height and causes less than ideal contact position.
- 16. Diagnosis – Clinical Evaluation D- Opposing teeth ! ! ! Plane of occlusion and occlusion play an important role on the loads exerted on the implant restoration. Occlusal scheme should be carefully evaluated for planning the centric and laterotrusive contacts. Type of restoration; Fixed would transmit more forces than the removable restoration. Prognosis of a compromised tooth might be negatively impacted when opposed by rigid implant restoration. Canine guidance Centric Protrusive
- 17. Diagnosis Study Casts Edentulous site along with the adjacent structures can be analyzed in detail on the casts. Diagnostic prototype in the missing tooth site would help visualize the proposed restoration. Location and alignment of the proposed implant can be studied through the diagnostic work up. Proposed tooth contours
- 18. Diagnosis Surgical Template It is used for imaging and surgical purposes. Fabricating a good template would enhance the diagnostic value of imaging and then guide successful placement of the implant. This template contains barium sulfate mixed with clear acrylic at the missing tooth site for radio opaque marking during tomographic imaging. Proposed implant alignment
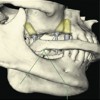
- 19. Diagnostic Imaging Radiological exam can be done with PA’s and PAN’s, however, further information can be obtained via tomograms. Below items are studied in the radiological exam: • Pathology at and around the site, • 3-D bone volume, • Bone quality through distribution of cortical and trabecular bones in the proposed site, • Anatomic structures/restrictions, • Restoration contours in relation to bone, • Optimal alignment of implant (perpendicular to the occlusal plane) within the bone. Ideal alignment seems to be possible in the facial view (yellow), however, proposed implant alignment would end up perforating the buccal plate (red) in the sagittal view. Therefore, implant axis needs to be redirected within bone (green) which would cause screw access hole buccally positioned.
- 20. Time Frame of Traditional Implant Therapy Pre-operative ~1 month (Dx & Tx Plan) Post-operative ~4-6 months (First 10-14 days no pressure, then Tx RPD as interim) Final restoration ~2 months (min. 2 weeks soft tissue healing before impression) Total minimum 7-9 months
- 21. Treatment Planning Restorative Design Fabricating the implant template initiates the restoratively driven implant therapy. This process would identify restorative concerns and possible restorative/surgical solutions. Implant restorations should have similar emergence profile as natural teeth for establishing and maintaining esthetic soft tissue architecture. This can be achieved by proper 3-D placement of the implant. Biomechanical guidelines: 1. Crown/implant ratio should not exceed 1:1. 2. Implant single crown should not extend lateral to the implant more than one implant diameter. Narrow occlusal table, using two implants or wide diameter implant are methods to compensate for potential overload. (Rangert et al. Forces and moments on Branemark implants. Int J Oral Maxillofac Implants 1989)
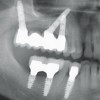
- 22. Treatment Planning Restorative Design Biomechanical considerations: Especially mandibular first molar sites should be carefully studied, since mesio-distal distance is usually over 10 mm. M-D distance measures about 12mm in this case. Placement of a wide body implant (5 mm diameter instead of 4 mm) along with narrowing the occlusal plane is intended to compensate for overloading. 12 mm 5 mm
- 23. Treatment Planning Restorative Design ! Biomechanical consideration for first molar site: M-D >12 mm Two 4 mm diameter implants were placed in the first molar site with over 12 mm mesiodistal distance. A splinted restoration was fabricated by using custom abutments and screw retained PFM crowns. Note the hygiene access.
- 24. Treatment Planning Restorative Design Occlusal guidelines: ! Light centric contact should be established. Shim stock should only be grasped when the musculature is fully engaged. ! Eccentric contacts should be avoided. Over-engineering and night guards are suggested for bruxors. ! Mild cusp heights are preferable since, otherwise bending moments and load magnification can cause overloading of the implant. Abutment selection guidelines: ! Screw or cement retained implant restorations can be fabricated. Various reasons (retrievability, amount of space, esthetics, occlusion, ease of operation, etc.) can be considered in choosing one over the other option. However, the decision should be made prior to the placement of the implant, since position of the implant might be slightly different in each option. ! The implant restoration should easily be cleansable.
- 25. Treatment Planning Surgical Placement Biomechanical success and restoration/tissue esthetics depend on the correct positioning of the implant in the bone. Optimal 3-D position of implant can be achieved by following below guidelines; Implant should be centered mesiodistally for minimizing cantilevering effect and creating normal emergence profile. Accurate implant position provides natural tissue contours.
- 26. Treatment Planning Surgical Placement Faulty mesiodistal implant placements Distally placed implant causes mesial lever arm when chewing force is at the mesial. This might initiate screw loosening and fracture. Lack of sufficient space between the tooth and the implant resulted in lack of papilla. There should be over 1.5 mm distance between the natural tooth and the implant for viable bone and papilla.
- 27. Treatment Planning Surgical Placement Faciolingual position of the anterior implant should be aligned under the cingulum of the proposed crown for screw retained restorations and under the incisal edge for cement retained restorations. Posterior implant should be centered faciolingually for reducing the potential for overloading. Implant is centered. Implant was aligned under the cingulum for screw retained PFM Implant along the incisal edge for cement retained PFM
- 28. Treatment Planning Surgical Placement Faulty faciolingual implant placement The body of the implant was facially positioned and inclined. Esthetic harmony could not be achieved due to variations in gingival levels and teeth lengths.
- 29. Treatment Planning Surgical Placement Incisocervical/occlusocervical position of the implant is mainly dependent on the location of the existing bone. However, there is a need to create emergence profile from implant’s round form to natural tooth’s elliptical form for achieving natural esthetics. The head of the implant should be 2-4 mm below the adjacent gingival margin. Implant template should represent the CEJ of the proposed restoration for guiding the surgery. Diagnostic work up leads to the implant template. 2-4 mm
- 30. Treatment Planning Surgical Placement Faulty incisocervical/occlusocervical implant position This implant has been placed too far beneath the gingiva. Result: The depth of the peri-implant is excessive leading to an increased risk of peri-implantitis and progressive bone loss around the implant. 30 months later Attachment level Gingival margin
- 31. Surgery – Implant Placement Flap is raised by employing papilla preservation technique for tissue esthetics. 2-4 mm Osteotomy is oriented through the cingulum for screw retained restoration.
- 32. Interim restoration Treatment Removable Partial Denture is worn following the surgery. The interim prosthesis should not exert pressure on the site/implant for undisturbed bone healing around the implant. Over the healing abutment Tx RPD should be relieved underneath the prosthesis at the time of healing abutment placement.
- 33. Implant supported provisional restoration The provisional restoration is the prototype of the final restoration. It is used to form the most ideal gingival contours for the definitive crown and also helps to test and reevaluate the restorative plan. Another use of the provisional restoration would be to keep it for long term evaluation if the osseointegration of the implant is questionable. Screw retained provisional
- 34. Implant supported provisional restoration Implant is excessively inclined towards the facial. Technical details of the crown fabrication would be considered at this time. The screw access hole can be readily visible at the incisal edge of the provisional restoration. In this situation unsupported porcelain cannot be built at the incisal edge for the final restoration, therefore restorative decision should be to make a custom abutment.
- 35. Abutment selection The final restoration can be either screw or cement retained. Various abutments can be used to facilitate the connection between the implant and the final crown. The UCLA abutment is the most versatile abutment, since it can be used for both screw and cement retained options. Screw retained restorations are used when retrievability of the restoration is desired and minimum incisocervical/occlusocervical height is available. The single piece restoration uses UCLA abutment and is screwed onto the implant through the access hole in the cingulum or central fossa of the crown. This method is used when the position and the angulation of the implant is ideal. However, a two piece restoration is used when the access hole exits the crown in an undesirable way. In these situations a custom abutment is fabricated to accommodate a crown piece with a lingual set screw. By this way, first piece (custom abutment) gets screwed onto the implant and the second piece (crown) is screwed onto the abutment.
- 36. Screw retained UCLA abutment restoration (single piece) Screw access through the cingulum.
- 37. Screw retained UCLA abutment restoration (single piece)
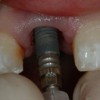
- 38. Screw retained UCLA abutment restoration (single piece) #30 was replaced with an implant restoration. Patient presented with a healing abutment after second stage surgery. Impression analog was placed onto the implant and full seating was confirmed with a PA. A PFM implant crown was fabricated and tried in. PA showed that the PFM was not seated all the way due to proximal contacts holding (arrow). After adjustments, implant restoration was fully seated and the connection screw was torqued onto the implant with a torque driver. The access hole was sealed with gutta- percha and composite on the occlusal surface. Tight contacts holding full seating of the crown.
- 39. Screw retained UCLA abutment restoration (single piece) Light centric contact was established while excursive contacts were avoided. Ideal position of the implant created natural emergence profile which lead to natural gingival and tooth esthetics.
- 40. Screw retained UCLA abutment restoration (two piece) Resin pattern of the custom abutment which changes the direction of the implant long axis. Full contour wax pattern of a labially inclined implant. Completed custom abutment (first piece) with lingual screw access (arrow).
- 41. Screw retained UCLA abutment restoration (two piece) Metal coping for the second piece fits over the first piece. PFM crown Screw lapping Completed and assembled PFM restoration. Note the level of the gingiva. Retention screw Abutment screw Custom abutment
- 42. Screw retained UCLA abutment restoration (two piece) Lingual set screw Gingival levels do not match but the patient does not display his gingiva due to low smile line.
- 43. Abutment selection The final implant crown can also be fabricated as cement retained restoration. It is more esthetic especially at the posterior sites due to lack of screw access hole through the occlusal surface. It can also be argued that clinical and laboratory procedures for cement retained restoration are less technique sensitive and similar to conventional crown. However, risk of leaving cement in the sulcus, not being able to seat the crown due to hydraulic pressure and increased need for space to accommodate two piece restoration are disadvantages for this type of implant restoration. Various abutments can be used to facilitate the connection between the implant and the final crown for cement retained restorations. These are all two piece restorations where the first piece is prepared like a tooth to receive a crown and screwed onto the implant. The second piece is fabricated just like a conventional PFM crown to be cemented over the first piece. The first piece can either be custom abutment (using UCLA abutment) or prefabricated abutment (metal and porcelain) provided by the implant manufacturer.
- 44. Cement retained restoration with UCLA abutment The UCLA abutment is utilized to fabricate the custom cement-on abutment in the desired form. Once the custom abutment is screwed and torqued onto the implant, the screw access hole is sealed with gutta percha. Then the PFM is cemented permanently in the conventional way.
- 45. Cement retained restoration with prefabricated metal abutment Gingi-hue abutment is provided by the implant manufacturer to be prepared like a natural tooth abutment. It is gold color plated to avoid showing gray hue through the tissue with metal color. A conventional PFM crown is fabricated on the abutment. First, the abutment is screwed on the implant and torqued for maximum stability. then the crown is cemented permanently.
- 46. Cement retained restoration with prefabricated porcelain abutment The prefabricated porcelain abutment is made from zirconia. It is considered the most esthetic abutment for the tissue and the crown. It has no greying effect on the tissue because of its white color. For best esthetic results, an all-porcelain crown can be placed on this abutment. The zirconia abutment is prepared like a natural tooth in the laboratory and a high strength porcelain crown is fabricated.
- 47. Cement retained restoration with prefabricated abutment WARNING: If the margin for the crown is placed very deep subgingival on the abutment, removal of the excess cement might be difficult during cementation. A temporary crown was cemented onto the prefabricated abutment. Two days later note the inflammatory reaction associated with the gingiva around the crown. These reactions are caused by impaction of cement into the sulcus upon cementation.
- 48. The End
New Lectures
 Computer Guided Treatment Planning and Surgery
John Beumer III DDS, MS
Allesandro Pozzi, DDS
Robert Faulkner DDS
Allesandro Pozzi, DDS
Robert Faulkner DDS
 Restoration of Posterior Quadrants and Treatment Planning
John Beumer III DDS, MS
Robert Faulkner, DDS
Kumar C. Shah DDS, MS
Robert Faulkner, DDS
Kumar C. Shah DDS, MS
 Angled Implants
John Beumer III DDS, MS
Allesandro Pozzi, DDS
Allesandro Pozzi, DDS
 Single Tooth Defects in Posterior Quadrants
John Beumer III DDS, MS
Robert Faulkner, DDS
Robert Faulkner, DDS