Both the methods used in making conventional impressions and digital impressions are shown in this presentation. The various impression materials are described and their suitability for fixed prosthodontic impressions is discussed. Materials described include irreversible hydrocolloid, reversible hydrocolloid, polysulfide, condensation reaction silicone, addition reaction silicone, polyether, and alginate substitutes. The design principles and methods for making custom impression trays are described. Impression methods are demonstrated in detail and are supplemented with a video demonstration.
Transcript
- 1. Secondary impression materials in fixed prosthodontics Charles J. Goodacre, DDS, MSD Professor of Restorative Dentistry Loma Linda University School of Dentistry This program of instruction is protected by copyright ©. No portion of this program of instruction may be reproduced, recorded or transferred by any means electronic, digital, photographic, mechanical etc., or by any information storage or retrieval system, without prior permission.
- 2. Definition of an Impression • It is a negative reproduction of the prepared teeth or implant(s), adjacent teeth, and surrounding soft tissues that provides the information required for fabrication of a crown or fixed prosthesis. • It is used to produce a positive replica of the oral structures recorded in the impression. • It is used as a permanent record of the mouth and for the fabrication of a restoration or prosthesis
- 3. How Impressions are Made • It can be made using a physical material or • The information can be recorded digitally Cerec Bluecam by Sirona
- 4. Physical Impression
- 5. Direct Digital Impression • Digital scan using a camera • CAD design (Computer Aided Design)
- 6. Indirect Digital Scanning Wax Pattern Made on Cast
- 7. Scan of Cast & Scan of Wax Pattern
- 8. CAD/CAM Milled Zirconia Crown It is milled in an oversized form due to the shrinkage that will occur upon firing.
- 9. Fabrication Sequence Scan of cast Scan of wax pattern Milled green-state crown Fired zirconia crownSurface colors applied
- 10. 3Shape scanner was used to scan the cast Katana CAD/CAM system was used to design and mill the zirconia copings
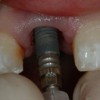
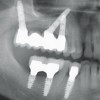
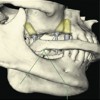
- 11. Ideal Requirements of a Good Impression – Record all the prepared tooth surfaces and some of the unprepared tooth cervical to the finish line. – With implants, record their position in the bone and relationship to teeth.
- 12. Ideal Requirements of a Good Impression • Record unprepared teeth so their shape can be used to establish the morphology of the crown / prosthesis and their lingual & occlusal surfaces can be used to establish the proper occlusion
- 13. Ideal Requirements of a Good Impression • Be made using a material that accurately records detail and maintains its dimensional stability for sufficient time to permit arrival at the dental laboratory so accurate fabrication procedures can be completed.
- 14. Impression Materials • Aqueous elastomers Irreversible hydrocolloid (alginate) Reversible hydrocolloid • Nonaqueous elastomers Polysulfide Condensation reaction silicone Additional reaction silicone Polyether Alginate substitutes
- 15. Alginate (Irreversible) Hydrocolloid • Mixed with water to form a Sol and it hardens chemically to form a Gel. • Undergoes distortion by syneresis (gives off water) and imbibition (imbibes or takes on water) • Detail reproduction is not excellent • Not well suited for fixed prosthodontics
- 16. Reversible Hydrocolloid • Agar = 8-15% • Water = >80% • Borax to strengthen the gel • Potassium sulfate (an accelerator of the setting of gypsum) is added to counteract borax which is a retarder of gypsum setting • Sol-Gel transformation (Sol = softened form and Gel = hardened form) • Hardening produces “brush-heap” intertwining of fibrils
- 17. Reversible Hydrocolloid • Hysteresis = Ability to be heated the gelled form to soften it and then cool it to create the gel form again. • Gel is boiled to soften, then held in ready to use state at 150 degrees F, then put in 110 degree bath to temper for placement in syringe, tray, and use in the mouth. • Uses special metal tray through which water circulates to cool & create gel • Undergoes syneresis and imbibition like alginate.
- 18. Characteristics of Reversible Hydrocolloid • Good detail reproduction and dimensional accuracy but must be poured before the syneresis or imbibition occurs with water changes that create distortion. • Today, it is not widely used in fixed prosthodontics.
- 19. Condensation Silicone • Catalyst is Tin Octoate • Reaction by-product is Ethyl Alcohol • Dimensional stability – Rapid evaporation of alcohol means you must pour impression immediately to maintain optimal accuracy • Mainly used today for duplication procedures and templates for fabrication of provisional crowns
- 20. Polysulfide (Rubber base, Thiokol, Mercaptan) • Polysulfide base contains mercaptan groups (-SH) that produce sulfur smell • Catalyst is Lead Dioxide • Adding drop of water accelerates reaction • Reaction by-product is water • Dimensional stability – Evaporation of water produces need to pour right away but not as critical as condensation silicone
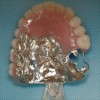
- 21. Polysulfide • It used to be the most commonly used material (1970’s & 1980’s) but is not commonly used today in fixed prosthodontics. • It is still used in complete denture prosthodontics today by some clinicians
- 22. Polyether • No by-products of reaction but is hydrophilic and therefore can give up or take on moisture • Dimensional stability – Excellent unless substantial humidity change occurs • Very stiff originally
- 23. Addition Silicone Poly (vinyl siloxane); Vinyl polysiloxane • Catalyst is chloroplatinic acid • Hydrogen gas byproduct was initial problem that caused voids on surface of gypsum. This problem has been virtually eliminated by use of palladium but still should wait a few minutes before pouring • Dimensionally accurate for a long time
- 24. Sample impressions
- 25. Single Crown Impression Video
- 26. Fixed Partial Denture Impression Video
- 27. Custom Trays & Their Fabrication
- 28. Requirements of a Tray • Rigid • Dimensionally stable • Provide space for impression material (2-3 mm minimum) • Promote retention of impression material • Possess a handle that allows a positive grasp of tray
- 29. Types of Impression Trays Stock trays 1. Plastic 2. Metal Custom trays 1. Autopolymerizing resin 2. Light-polymerized resin
- 30. Advantages of Custom Trays • Made to fit the arch – needed for some patients • Carries and confines the material to certain difficult areas – distal surfaces of last molar • Uses less impression material
- 31. Tray Extension, Form, & Thickness • Should extend to cover required areas without impinging on other areas such as bony undercuts • Extend 5 mm beyond gingival margin • Do not have to cover palate • Thickness of 3 mm
- 32. Tray Fabrication • Fabricate autopolymerizing resin trays well in advance of appointment so all polymerization shrinkage has occurred – 24 hours. • Some clinicians use stops to control the tray seating while minimizing tooth contact with the tray because contact affects the accuracy of the impression in the area where the tray contacts the teeth.
- 33. Custom Tray Fabrication Technique Autopolymerizing Resin • Diagnostic cast with extension marked
- 34. • Diagnostic cast with extension marked • Covered with two layers of denture baseplate wax or beeswax Custom Tray Fabrication Technique Autopolymerizing Resin
- 35. • Diagnostic cast with extension marked • Covered with two layers of denture baseplate wax or beeswax • Small notches can be cut into the wax for those who wants stops Custom Tray Fabrication Technique Autopolymerizing Resin
- 36. • Diagnostic cast with extension marked • Covered with two layers of denture baseplate wax or beeswax • Small notches can be cut into the wax for those who wants stops • Cover the wax with aluminum foil Custom Tray Fabrication Technique Autopolymerizing Resin
- 37. • Diagnostic cast with extension marked • Covered with two layers of denture baseplate wax or beeswax • Small notches can be cut into the wax for those who wants stops • Cover the wax with aluminum foil • Mix the autopolymerizing resin and mold when it is no longer “stringy” and has a “doughy” consistency Custom Tray Fabrication Technique Autopolymerizing Resin
- 38. Place a drop of monomer to enhance bonding of the tray handle
- 39. Custom Tray Fabrication Technique Light-Polymerized Resin • Same marking of tray extension on cast • Sheet of resin material applied over cast • Excess trimmed with a knife & handle applied • Air-barrier coating material is applied to enhance the polymerization process • 5 minutes of polymerization in light unit
- 40. Blocking out spaces between teeth Ultradent LC Block-Out Resin Wax can be used but there is a better solution
- 41. The Continuum of Treatment: Examples Of Good Tooth Preparation Followed By A Good Impression
- 42. Two Metal Ceramic Crowns
- 43. Ten All-Ceramic Crowns
- 44. Diagnostic Wax Patterns
- 45. Vacuum-Formed Template Flowable composite resin
- 46. Resin application using template – moist or lubricated tooth surfaces with no etching
- 47. Esthetic evaluation of resin veneers
- 48. Thank You For Your Kind Attention Charles J. Goodacre, DDS, MSD Professor of Restorative Dentistry Loma Linda University School of Dentistry
- 49. v Visit ffofr.org for hundreds of additional lectures on Complete Dentures, Implant Dentistry, Removable Partial Dentures, Esthetic Dentistry and Maxillofacial Prosthetics. v The lectures are free. v Our objective is to create the best and most comprehensive online programs of instruction in Prosthodontics
New Lectures
 Single Tooth Defects in Posterior Quadrants
John Beumer III DDS, MS
Robert Faulkner, DDS
Robert Faulkner, DDS
 Restoration of Posterior Quadrants and Treatment Planning
John Beumer III DDS, MS
Robert Faulkner, DDS
Kumar C. Shah DDS, MS
Robert Faulkner, DDS
Kumar C. Shah DDS, MS
 Implants and RPDs
John Beumer III DDS, MS
Ting Ling Chang DDS
Robert Faulkner DDS
Ting Ling Chang DDS
Robert Faulkner DDS
 Angled Implants
John Beumer III DDS, MS
Allesandro Pozzi, DDS
Allesandro Pozzi, DDS